 Pin this
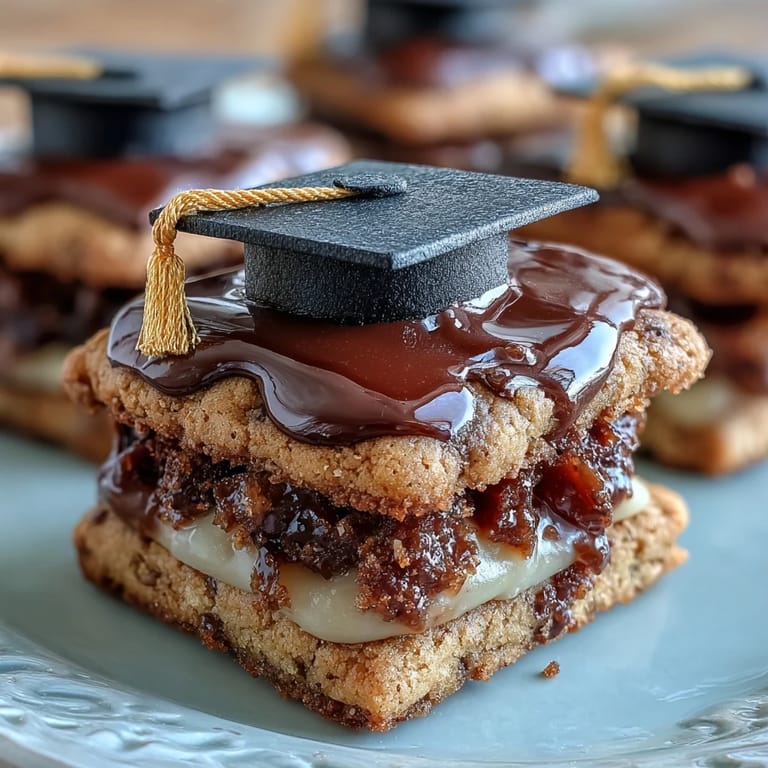
 My neighbor called me in a panic two days before her daughter's graduation party—she'd promised homemade cookies but had zero ideas. We ended up in my kitchen on a random Tuesday afternoon, flour everywhere, laughing at how fondant squares looked nothing like mortarboards at first. By the time we finished decorating that batch, we'd created something that felt both celebratory and genuinely doable. Now whenever I make these, I think about how the simplest cookies become something memorable the moment you add a little ceremony to them.
I brought a batch to my cousin's small graduation dinner, and her best friend from childhood asked for the recipe before even finishing her first cookie. That's when I realized these aren't fancy—they're just thoughtful in a way that hits different when someone's marking a milestone. Watching people's faces when they realized the mortarboard was actually edible fondant made the whole afternoon feel less like hosting and more like being part of something joyful.
Ingredients
- All-purpose flour: Use a reliable brand you know, because cheap flour sometimes absorbs moisture differently and can make your dough too sticky—I learned this the hard way by adding extra flour mid-mix.
- Unsalted butter: Room temperature is non-negotiable here; cold butter won't cream properly and you'll end up with dense cookies instead of tender ones.
- Granulated sugar: Don't swap this for brown sugar thinking it'll add flavor—it changes the entire texture and spread of the cookie.
- Egg: One large egg is enough; extra eggs turn these into cake-cookies, which sounds nice but isn't what we're after.
- Black fondant: Buy pre-colored if you can; making your own requires food coloring that'll stain your hands for days.
- Yellow fondant: For tassels, though you could use gold or your graduate's school colors instead.
- Powdered sugar for icing: Sift it if it's lumpy, otherwise your icing will feel grainy and look unprofessional.
Tired of Takeout? 🥡
Get 10 meals you can make faster than delivery arrives. Seriously.
One email. No spam. Unsubscribe anytime.
Instructions
- Prep your oven and workspace:
- Set your oven to 350°F and line those baking sheets while you're thinking about it—there's nothing worse than realizing mid-bake that you forgot parchment paper. It takes thirty seconds now but saves real frustration.
- Mix the dry ingredients:
- Whisk flour, baking powder, and salt together in a medium bowl, making sure there are no pockets of baking powder hiding in the corners. This step prevents chalky tastes and ensures even rise.
- Cream the butter and sugar:
- Beat them together for two to three minutes until the mixture looks pale and fluffy—you'll see it go from grainy to almost mousse-like. Don't skip this; it's what makes these cookies tender instead of tough.
- Add the egg and vanilla:
- Beat until fully combined, which takes about a minute of mixing. The mixture will look slightly separated at first but keep going until it comes together.
- Combine wet and dry:
- Add the flour mixture in two additions, stirring gently between them—overmixing at this point makes tough cookies, so stop as soon as you don't see flour streaks. You'll feel when it's right.
- Roll and cut the cookies:
- Place your dough between two sheets of parchment paper and roll to about a quarter-inch thick, which gives you cookies that are sturdy enough to hold fondant but still tender inside. Cut into rounds or squares around two and a half inches across.
- Bake until golden:
- Ten to twelve minutes is the sweet spot—the edges should look just barely golden while the centers are still slightly soft. They'll firm up as they cool, so don't overbake or they'll be hard.
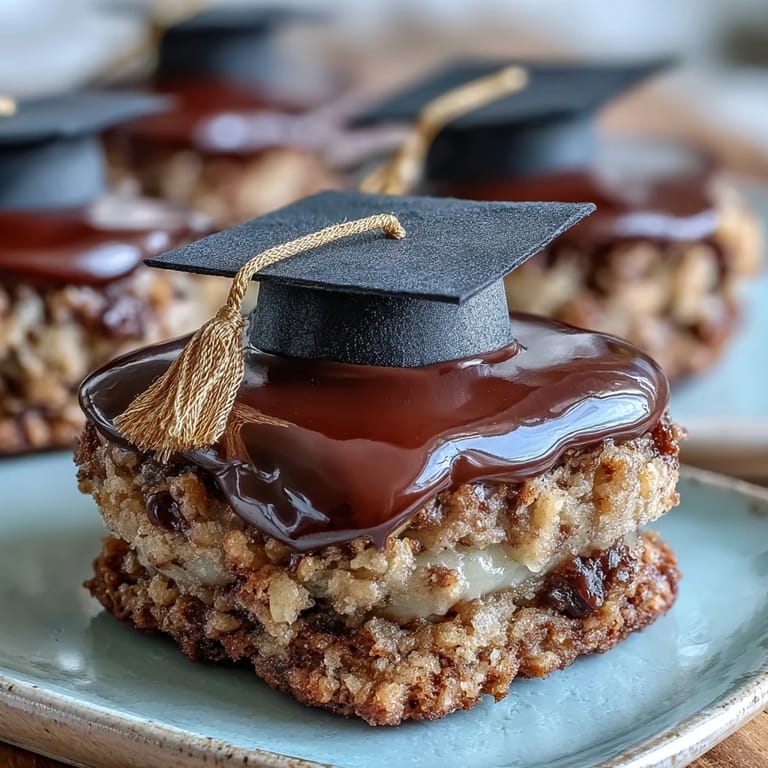
- Prepare the fondant pieces:
- While cookies cool, roll black fondant to about an eighth-inch thick and cut small squares for the mortarboard tops, then roll little cylinders for the base pieces. Dust everything lightly with cornstarch so the pieces don't stick to your fingers.
- Make the yellow tassels:
- Roll yellow fondant into thin ropes and cut into one-inch pieces, then shape them slightly so they look like actual tassels instead of just chunks. This part's fun and forgiving—there's no wrong way to make them look good.
- Mix your icing:
- Combine powdered sugar with milk and vanilla until you get something that spreads smoothly but holds its shape—not too thick and not too thin. If it's too thick, add milk one teaspoon at a time.
- Decorate each cookie:
- Use a small dab of icing to secure the fondant square in the center of each cooled cookie, then place the fondant cylinder underneath as the base. Finish with a tiny bit of icing holding the yellow tassel to one corner of the mortarboard square.
- Let everything set:
- Give the decorations twenty to thirty minutes to firm up before you package or serve them, which prevents the fondant from sliding around. This is the perfect time to make coffee and congratulate yourself.
 Pin this
 There's something about serving cookies that are obviously handmade but don't require you to spend all day in the kitchen. My brother's friend came back three weeks after his graduation party just to ask if I could make these for his going-away dinner, which felt like the highest compliment—not fancy enough to be intimidating, just personal enough to matter.
Customizing Your Mortarboards
The beauty of these cookies is that you can color-coordinate them to match whatever school or program your graduate attended. I've made red and white mortarboards, navy and gold, even purple and silver—the fondant takes food coloring beautifully if you knead it in thoroughly. You could also skip the yellow tassels entirely and use the graduate's actual school colors for the base and tassel, making each cookie feel even more personal and celebratory.
Storage and Make-Ahead Strategy
The actual cookies keep in an airtight container for five days, which means you can bake them up to three days before your event and decorate the day of if that suits your schedule better. The fondant decorations don't soften or get weird if stored properly, so you're not locked into a rushed timeline. I usually bake on day one, decorate on day two, and pack them up day three, which lets me enjoy the process instead of turning it into an all-day scramble.
Shortcuts Without Sacrificing the Moment
If you're working with a genuinely tight timeline, store-bought sugar cookie dough bakes up just as nicely, and pre-colored fondant is already widely available so you're not mixing food coloring for an hour. The fondant mortarboards are what make these feel special, so that's where I'd keep the focus if you're choosing where to cut corners.
- Pre-colored fondant saves time and keeps your hands from looking tie-dyed for the next three days.
- Buying cookies from a local bakery and just adding the fondant decorations is completely honest and still heartfelt.
- Rolling the fondant while watching something you enjoy makes the whole process feel less like a task and more like something you chose to do.
 Pin this
 These cookies exist in that rare space where they're genuinely easy but still feel like you put thought and care into them. Make them without overthinking, trust the process, and watch people's faces light up when they realize the mortarboard is actually edible.
Frequently Asked Recipe Questions
- → How do I prevent cookies from spreading during baking?
Ensure the dough is well-chilled before baking and avoid overmixing to maintain shape integrity and prevent spreading.
- → What is the best thickness to roll the dough?
Roll the dough to about 1/4-inch thickness for even baking and sturdy bases to hold the fondant decorations.
- → How can I keep fondant decorations looking fresh?
Allow the icing to set fully so the fondant adheres firmly, and store cookies in airtight containers away from heat and humidity.
- → Can I customize the fondant colors?
Yes, fondant can be colored to match school or celebration colors using gel food coloring before shaping.
- → Are there alternatives to powdered sugar icing?
A simple glaze made with milk and vanilla, as used here, provides a smooth adhesive without overpowering sweetness.